Follow along with the video below to see how to install our site as a web app on your home screen.
Note: This feature currently requires accessing the site using the built-in Safari browser.
We noticed you are blocking ads. DO THE TON only works with community supporters. Most are active members of the site with small businesses. Please consider disabling your ad blocking tool and checking out the businesses that help keep our site up and free.
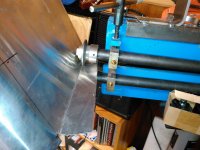
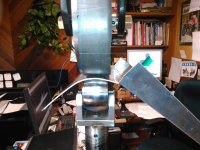
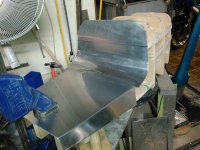
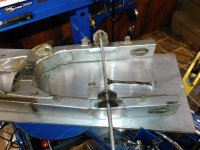
I formed the front seat section flanges by starting them on the bead roller using a "tipping wheel". This gets the flanges to about 70 degrees, and it's easy to get them to 90 by just backing the flange with a 2x4 and forming with a soft hammer.
To form the 3" radius flange i used a combination of hand forming over a piece of tube, and using the English Wheel.
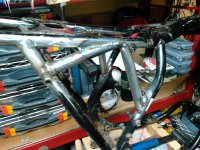
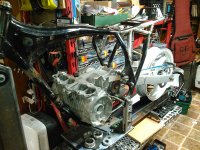
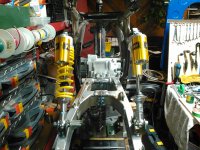
My tooling arrived, so I switched back to the chassis. I added the first set of tubes to brace the shock mount area. I might do additional bracing, but I'll wait until I decide where the battery is going to mount.
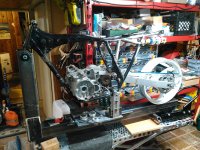
I threw the frame up on the frame jig to get the rear wheel aligned. I checked the rear wheel position and compared it to my CAD models and they are within 1mm, so that's good.
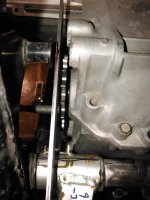
The sprockets are about .25" out of line. I can get an offset front sprocket, or machine .25" off the sprocket carrier. I think I'll wait until the tires show up to decide. Offset front sprockets are $80 USD, and I can machine the carrier for nothing, so as long as I have clearance from the chain to tire, I'll likely lean towards machining the carrier.
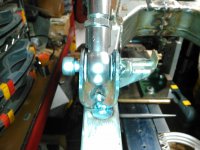
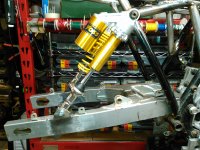
I marked out the shock mount locations, clamped them in place, checked alignment with a thru rod, and tacked the mounts in place. I have a gusset made for the right hand mount, but I'll wait until I get the rear wheel positioned and spacers made before I commit to fully welding the shock mounts. I made the mounts a bit wider than the shock mount to allow for some adjustment. When the time comes I'll machine some spacers to take up the gaps.
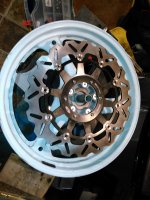
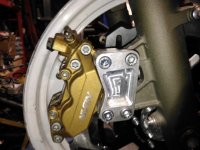
Mail today! (actually DHL). I did some research for these Arashi disks, and people seemed to be happy. The price was right compared to new, and at least you aren't getting worn out or bent used samples on Ebay.
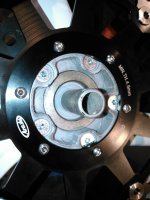
I laid out the stock GS disk and a CBR954RR disk in CAD and the CBR disk was going to make the caliper mounting easier to the CBR600F4 forks that I'm using. I need an adaptor to go from the 5 hole GS disk to the 6 hole CBR disk. I 3D printed an adaptor that seems to work well. Once I have everything nailed down I'll machine this out of aluminum.
I 3d printed a prototype caliper bracket to mate the CBR954RR caliper and disk to the GS500 wheel and CBR600F4 forks.
I really hesitated before buying a 3d printer, but after getting it I haven't regretted it for a second. Something like this bracket used to mean a couple of hours programming, and 4 hours of standing in front of the milling machine, and $20 of aluminum.
Now, it's 20 minutes of CAD modeling, and 4 hours of doing something else while the part prints using $1 worth of print material.
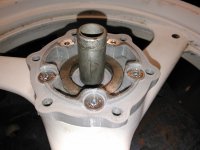
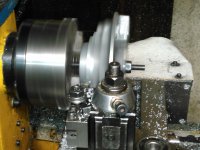
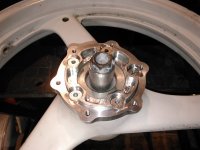
Taking .25" off the cush drive was easier said than done. The back of the carrier has 5 drive spokes, so it wouldn't fit in a 3 jaw chuck, or a 4 jaw chuck.
I ended up holding the front of the carrier in a 3 jaw, and machining "backwards". I used a long drawbar thru the spindle to secure the carrier against the cutting force.
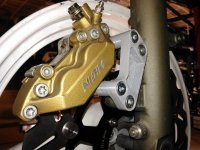
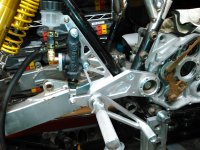
Right side rearset and brake finished. The rearset is a prototype that I did a few years ago and never put into production, the pegs/levers are Tec-Bike that I had bought just to check out the quality, (not bad, but not to Tarozzi standards) and the master cylinder is a Yamaha/Brembo from a 1999 R1 that was lying around in the parts bin.
Say what you will about Amazon, but I ordered the remote reservoir on Thursday and it was delivered on Sunday. USA guys are used to quick/cheap shipping, but us in the Great White North are not. Before Amazon, everything took 2-4 weeks to arrive.
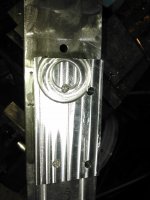
Well, it happens to the best of us. A wasted afternoon of machining. The front side went OK, when I flipped it over to do the backside I got my datums confused when programming, so the the very first cut you see should have been centered around the drilled hole. DOH!
Sometimes when you screw up you get lucky and catch it before it ruins the part, not this time. The center of the raised area needs to be concentric with the hole. Try again tomorrow.
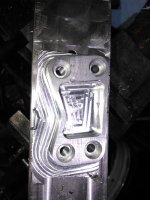
F**k-up salvaged. I thought about it overnight, and decided I could salvage the part. I re-zeroed the part correctly and finished the machining. I then skimmed another 0.20" off the screwed up tower, machined a 0.25" spacer, and welded it on to the tower. Re-mounted the part in the holding jig, zeroed the cutter at the height of the good tower, and took the approx. 0.05" off the spacer.
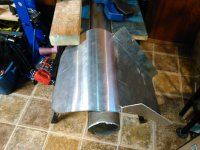
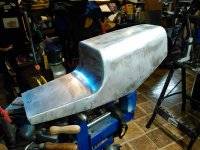
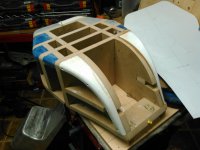
Some progress, finished the tail section. (Besides some minor trimming)
This project is actually a filler project. I am still in the process of hammering out the final finish details on another CB400F that has been a long ongoing project.
If this was going to be polished there would still be some more work required filling in some weld marks, but since I am planning on paint a thin layer of filler will suffice.
Time to start on the gas tank, and painting the wheels.
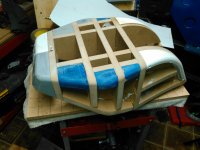
I made some more progress. I finished my buck for the gas tank. I tried something new this time, a blending of old technology and new technology. I 3D printed some components of the buck to go along with the MDF sections. I did a quick video to explain.https://www.youtube.com/watch?v=My5Ptr-greY&feature=youtu.be
Not sure why the video is so small?
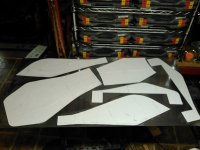
Some still shots of the buck, and the patterns laid out on the sheet. 2' x 4' x .080 thick 3003-H14.
Total time into the buck so far is about 10 hours. I got sick of tripping over the tail section buck this week so I sacrificed it to the Gods of Garbage to clean up the shop a bit.
Thanks Special K. But I don't consider myself as having any more skills than anyone else could if they set their mind to it.
In about 2000 I just decided that I wanted to learn how to TIG weld. The local Lincoln dealer was having an open house, they had a Tig welder setup. I had a quick 5 minute lesson, and was welding. I bought the welder and just started practicing.
The next year I bought a small combination lathe/milling machine that I could get in the basement, and learned how to use it. 5 years later I did my research on the internet and converted it to CNC.
A few years ago I decided I should learn how to work with sheet metal. I used my lathe/mill/welders to build an English wheel, bought some hammers and shot bag, and started to work with aluminum sheet. My first gas tank took 2 years and 3 tries, but on the 3rd attempt I had something.
Now my sheet metal skills are improving and it's really a question of speed. What used to take 3 hours now takes 1 hour, and I continue to find better ways to do things.
This site uses cookies to help personalise content, tailor your experience and to keep you logged in if you register.
By continuing to use this site, you are consenting to our use of cookies.